Logo
  • PHP
    • HipHop / HHVM
    • Modern PHP
    • PHPStorm
    • LAMP
    • Laravel
    • Composer
    • PDO
  • JavaScript
    • node.js
    • AngularJS
  • CSS
    • SASS
    • “CSS4” (CSS level 4)
  • HTML
  • Git
  • LAMP
  • Vagrant
  • UI / UX
  • Architecture of …
  • Off-Topic
With ♥ from Berlin
August 31, 2013
Chris
LAMP, Linux, Local Development, PHP, Vagrant, Virtual Machine / VM
9

How to setup a (or multiple) server/LAMP-stack inside a virtual machine for local development with Vagrant and PuPHPet

PreviousNext
vagrant

You know this: You need a new server, something to develop on, something to test on, something to put your project. That’s probably the most common thing every developer faces. Usually you would

A.) setup a development environment locally, which means you install PHP, MySQL and all the stuff you need on your local machine, by hand or in pre-configured bundles (like Ampps [Win, Mac], EasyPHP [Win], WampServer [Win], SecureWAMP [Win] or even Xampp [Win, Mac, Linux]).

B.) rent a real server somewhere, for development usually something smaller, preconfigured or naked.

C.) create a virtual machine on your local machine.


THE PROBLEM WITH LOCAL DEVELOPMENT ENVIRONMENT:

As you are working on your very personal machine, you’ll have to develop all your projects, all your clients’s sites, all your tests etc. in the same environment. Change one config value and it’s activated for all your projects. Beside that, you are mixing up private projects, client’s (sensitive?) data and maybe critical tests, that may block/freeze/kill your system. Especially in linux, a wrong bash command command can kill your working system (which is your server at the same time). For Win/Mac users it’s also diffcult as the most command line options and linux tools are not directly available there.


THE PROBLEM WITH RENTED DEVELOPMENT SERVERS:

An established workflow, but this has also some big disadvantages, especially when you work for several clients: Do you want to keep a development machine for all the clients you have (and ever had) running 24/7 – and pay for the server ? Plus, handling problems, eventual attacks and pay for overtraffic ? Pro-argument: The server is usually reachable for your client, making it easy to give live-access.


THE PROBLEM WITH LOCAL VIRTUAL MACHINES:

In theory an excellent solution, as you can run a perfectly fitting server on your local machine, you have full root access, you can create masses of VMs and handle them like real server, you can also zip them away an archive them (useful for non-active projects or older clients). You can also route the IPs and ports to make them public accessable! But, it’s a shitload of work to get this to work.


VAGRANT IS THE SOLUTION !

Vagrant & PuPHPet solve exactly that problem:

Vagrant is an installable tool for Windows, Mac OS X and Linux that creates ready-to-go virtual machines, out of a simple config file. You say which linux distribution you need, what version of PHP, MySQL, Apache, modules, extensions etc, you can even define the to-be-installed packages, set passwords and create database users. All you need is a config file. You install these machines with one line on the command line (works perfectly on Windows too), start them with one command, stop them with one command, delete them with one command. You can access the machines via SSH like every other server. You can zip these “boxes” if you need space, and you can give the config file to somebody else, who will be able to create EXACTLY the same box. Perfect for team development. Killer feature: The /var/www folder (or else) can be live-synced with a local folder on your host system, so you don’t even need to login and transfer files.
PuPHPet is, as the name implies, related to Puppet (which creates and handles servers), basically it’s “a web application that allows you to easily and quickly generate custom Vagrant and Puppet controlled virtual machines”. In other words: puphpet.com is an extremely easy-to-use website that will create the Vagrant config files for you: You simply select distro, version of PHP, etc. on the site and let generate a downloadable config file, which will then install a virtual machine on your local computer. Boom!


Requirements

  • VirtualBox (free for Win, Mac, Linux)! Vagrant will also run with other virtualization tools, but VirtualBox is the default use case, so let’s focus on that.
  • To connect to the server you’ll need a SSH tool, sure ;)
  • Windows users will need PuttyGen (to convert the ssh key) and a real ssh command line tool like Putty would also be useful. For visible FTP-like access to the server I recommend WinSCP.


Setting up the first machine

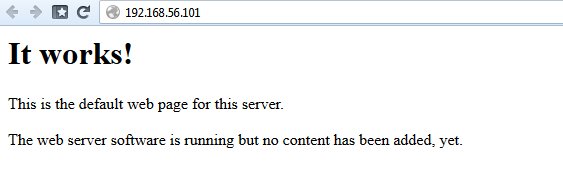
So, what will happen, basically ? We will create a config file (which is indeed a zipped folder, but more on that later) on https://puphpet.com by selecting what we want to have on our virtual machine, download that file, unzip it, open the terminal/bash/command line tool, navigate to that unzipped folder and trigger the creation of the virtual machine by just typing in one command (while being in that folder). Vagrant will create a virtual machine from the information inside that folder (some config parts will be saved by Vagrant in that folder, the virtual machine itself will be saved into VirtualBox’s virtual machine’s folder, more on that deeper in the tutorial). 3-5 minutes later you’ll have a fully installed server that is accessable via SSH and has its own IP. When you open that IP with a browser you’ll already see the well-known “It works!” page from Apache, and all the software is installed exactly as it should be.


Download and install Vagrant

Get Vagrant on http://www.vagrantup.com/ and install it on your machine.


Create a config file on Puphpet.com

puphpet.com is an extremely useful web interface for creating Vagrant config files. In this tutorial we will create a config file for LOCAL usage. But as the sites states, you could also get an account on DigitalOcean.com or Rackspace and use their servers.

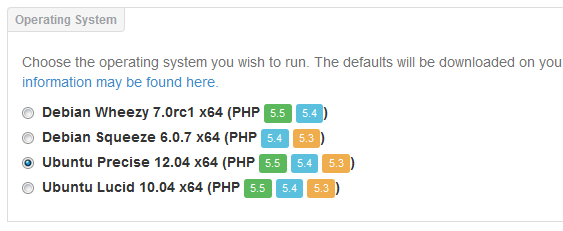
Choose the OS, in this tutorial we will use Ubuntu Precise 12.04:

vagrant-puphpet-select-operating-system-ubuntu precise 12.04 ubuntu lucid 10.04 debian squeeze 6.0 debian wheezy 7.0 7.1

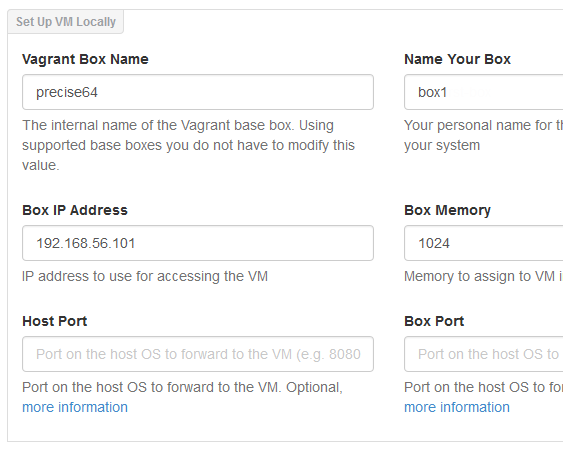
In the “Set Up VM Locally” box, DON’T CHANGE the Vagrant Box Name ! This name shows vagrant which operating system to download, so don’t change it manually !!! The possibility to change this form field is obviously an error in puphpet.com.

Change “Name Your Box” to something remarkable, in this tutorial we name it “box1” (to recognize the box better when using multiple VMs). The IP should stay like it is. Please note: the given standard IP ends with .101, which is perfect for our first box. When we set up more boxes, we will give them IPs like .102, .103 etc.!

Keep the rest like it is.

vagrant-puphpet-box-name-ip-adress-memory-host-port-box-port

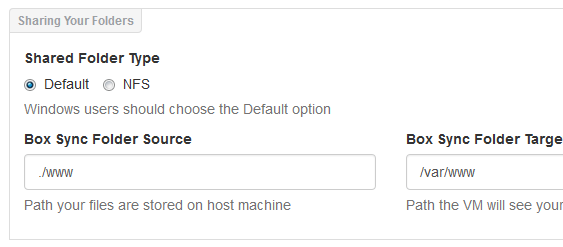
In the “Sharing Your Folders” box, change the “Box Sync Folder Source” from

./

to

./www

which will sync the contents of the folder “www” in your local vagrant box folder with the /var/www folder inside your virtual machine. We will create that folder later. It should look like this now:

vagrant-puphet-shared-folder-var-www

Leave the sections “Server Basics” and “HTTP Server” as they are – unless you know what you are doing.

In the “PHP” section, set your PHP version. Please note: PHP 5.3 is not available for Debian 7 and PHP 5.5 is not available for Debian 6. Selecting PHP 5.5 seems a good idea, and having composer on the machine is also a good idea.

vagrant-puphpet-choose-php-version-composer

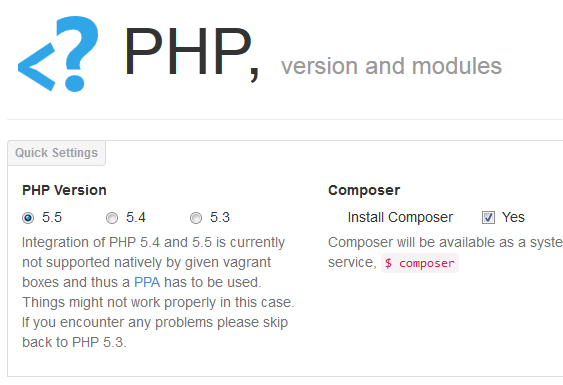
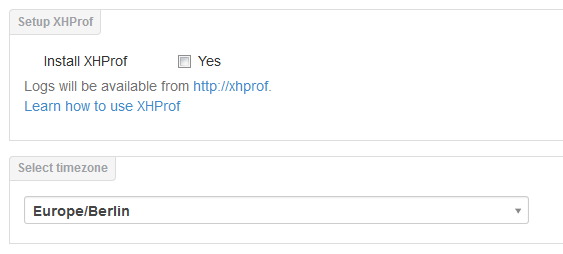
Skip the rest of the PHP section (but have a look on it, these things might be interesting for you) and go to “Setup XHProf”. For this tutorial we uncheck the tick box, simply because we don’t need XHProf (and to be honest, I’m not really into the tool).

Select your timezone (might be important for database stuff).

vagrant-puphpet-timezone-xhprof

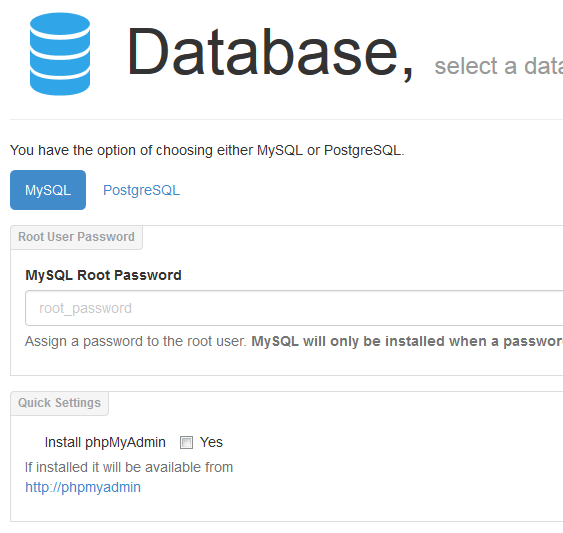
In the “Database” section, set a MySQL root password and UNCHECK the phpmyadmin installation. Currently, in August 2013, phpmyadmin doesn’t work when installed with a puphpet-generated Vagrant config file. We will install phpmyadmin later.


vagrant-puphpet-mysql-postgres-root-password-and-install-phpmyadmin

Finally, let’s finish this and generate the Vagrant config file with the big button the page’s bottom.


Create a local virtual machine from Vagrant config file

Create a folder that will hold your Vagrant boxes, i named my “vm” on my D:/ drive (the development drive). Unzip your just downloaded config file here. You’ll have a “precise64” folder inside “vm” now. Rename the “precise64” folder to “box1“. I don’t know why puphpet generates folders with the distribution name, not the box name, but we don’t care yet. Honey badger.

Create a folder “www” inside the “box1” folder. The contents of “www” will be synced with /var/www of the box in realtime.

Open the command line tool / terminal (Windows users: search for cmd, in case you never worked with the command line), go into the “box1” folder and type

vagrant up

That’s it. After a short time you’ll see something like this:

vagrant-up-on-the-windows-command-line-cmd

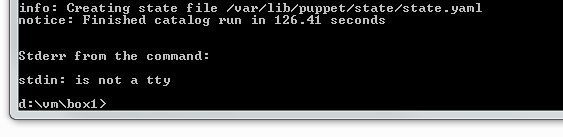
Two minutes for setting up a full stack Ubuntu server. Well done, Vagrant!


Logging into the VM

Linux/Mac users can now ssh directly into the VM via [Dear readers, please verify this!]

vagrant ssh

Windows users need to open PuttyGen, then “File” -> “Load private Key” and select the “insecure_private_key” file from C:\Users\XXXXX\.vagrant.d\

Note that you need to select “All files” in the file opening screen as the “insecure_private_key” has no file ending.

Click “save private key” and save the file in the same folder, name it “my_private_vagrant_key.ppk” or something like this.

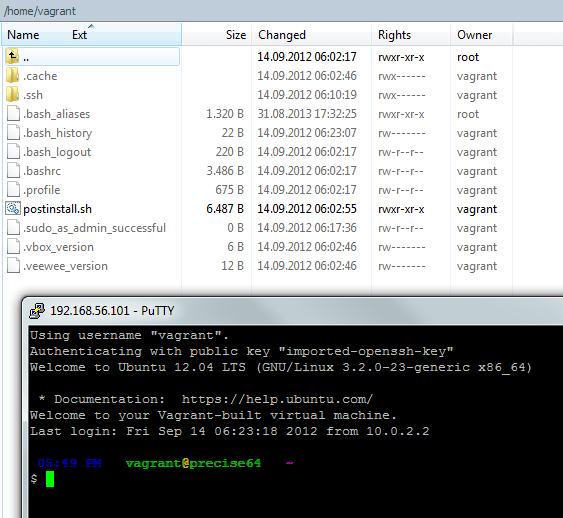
After the key is created, log into the server with WinSCP (or via Putty, if you prefer that and know how to do it): Select protocol (I use SCP), enter the IP of your VM (192.168.56.101 or .102 etc.), port stays 22, user name is “vagrant”, password keeps blank, the private key file is the file you just created. Save that stuff (for further use) and log in:

You’ll see something like this:

logged-into-vagrant-vm


BOOOM! You’ve set up a real server in a virtual machine on your local pc. To prove that everything runs fine, check the installed version of PHP on the command line (Windows users: this time in putty, not the windows command line):

php -v

You should see something like “PHP 5.5.3 …“. By the way, as I’m writing this tutorial, PHP 5.5.3 has been released just a few days ago – and puphpet has provided us the very latest version of PHP already! This is really awesome, as getting up-to-date PHP versions is usually a big pain in the ass on linux. To check the Apache, simply type the VM’s IP into your browser. You’ll see the very well known Apache index page:

vagrant-puphpet-successfully-installed-checking-apache

We are done! If you need phpmyadmin, install it with:

sudo apt-get install phpmyadmin


Stopping and deleting a VM

To stop the VM, type

vagrant halt

on the windows command line (or your host’s command line) while being into the “box1” folder. To delete the VM (this means Vagrant will really delete the full server, but leaving the config files available) type

vagrant destroy

while being in the “box1” folder. Don’t simply delete the box’s folder without destroying the box first, or you will leave dead virtual machines on your system. In case you run into problems, delete the box folder, and the according virtual machine file in VirtualBox.

The “vagrant xxx” commands only do things to the boxes in which folder you currently are.


Where does Vagrant save the VMs ?

Vagrant keeps some configs in the box’s folder (“box1”), and saves the VMs into VirtualBox’s Virtual Machines folder. Keep an eye on that, as a fresh precise64 is more than 2 GBs!


How to setup another virtual machine

Do exactly the same like before, but this time name your box “box2” on puphpet.com, give it another IP (if your first box was 192.168.56.101, then this box will be 192.168.56.102), and move the extracted files into a folder named “box2”. Open the command line, go into the folder, type

vagrant up

and your machine is running. To connect, use the IP (… .102), vagrant as username and the already created ssh key file.


Creating multiple server within ONE virtual machine

Vagrant offers the possibility to create multiple servers from one virtual machine, at least if I understand them right. This is done with “forks” of the initial snapshots of the virtual machine. However, I think to set this up for WEEKS, but totally failed. I also have never seen people working like this, so setting up a real VM for every servers seems legit.


Troubleshooting

1. Don’t change the Set Up VM Locally field manually.

2. Every box (on your machine) needs a unique “Box Name” !

3. Every box (on your machine) needs a unique IP! Setting the IPs to .101, .102 etc. seems totally valid.


This article was written quite a while ago (9 years), please keep this in mind when using the information written here. Links, code and commands might be outdated or broken.

Random articles

  • How to setup a local server (in a virtual machine) with Vagrant in PHPStormHow to setup a local server (in a virtual machine) with Vagrant in PHPStorm
  • How to install/setup a basic LAMP stack (Linux, Apache, MySQL, PHP) on Ubuntu 14.04 LTSHow to install/setup a basic LAMP stack (Linux, Apache, MySQL, PHP) on Ubuntu 14.04 LTS
  • [Link] How to set up HipHop, Nginx and Laravel in Ubuntu 12.04 LTS (in a Vagrant box)[Link] How to set up HipHop, Nginx and Laravel in Ubuntu 12.04 LTS (in a Vagrant box)
  • Generate Vagrant boxes with Laravel, HipHop, Nginx, WordPress, MySQL, MariaDB, MongoDB, RabbitMQ etc. with one clickGenerate Vagrant boxes with Laravel, HipHop, Nginx, WordPress, MySQL, MariaDB, MongoDB, RabbitMQ etc. with one click
  • How to copy Vagrant boxes (or duplicate them)How to copy Vagrant boxes (or duplicate them)
  • A list of downloadable Vagrant boxes (CentOS 5.9 / 6.4, Ubuntu 12 / 13, Debian 6 / 7 / 7.1 / 7.2)A list of downloadable Vagrant boxes (CentOS 5.9 / 6.4, Ubuntu 12 / 13, Debian 6 / 7 / 7.1 / 7.2)
  • How to install/setup a basic LAMP stack (Linux, Apache, MySQL, PHP) on Ubuntu 12.04 or Debian 7.0/7.1How to install/setup a basic LAMP stack (Linux, Apache, MySQL, PHP) on Ubuntu 12.04 or Debian 7.0/7.1
  • How to install php-login-one-file on Ubuntu 12.04 LTSHow to install php-login-one-file on Ubuntu 12.04 LTS
  • EOL lists of Ubuntu, Debian and CentOS for your server planningsEOL lists of Ubuntu, Debian and CentOS for your server plannings
LAMPlinuxPHPpuphpetpuppetUbuntuvagrantvirtual machinevm
Share this

9 Comments

  • Paul Szerlip
    May 2, 2015 11:55 pm

    Hi Chris,

    I am so impressed by all that is here at dev metal, and I owe so much for all that is being provided.

    That said….I’m stuck. I looked all over the place for the past two hours to figure this problem out and could really use your help. I am not able to log into the server. I don’t know, but I think it may have something to do with PuPHPet, because it’s way different than in your tutorial. Ugh…I’m dying…so tired.

    Please, if you could, help :(

    Reply
    • Paul Szerlip
      May 4, 2015 1:11 am

      I was able to start the server by installing git and then using cmd
      set PATH=%PATH%;C:Program Files (x86)Gitbin

      and then running vagrant ssh in the cmd window

      That said, I am still lost using this vagrant box. I use ubuntu on my main system and feel a lot more comfortable with a full install on virtualbox. So I’m going to do a fresh install of ubuntu LTS and set up my dev server there.

      Reply
  • Alex Stevenson
    November 11, 2013 12:14 pm

    Great guide. Actually you can select the “Install phpmyadmin” but as you pointed out it doesn’t work by default in Windows.

    I’d rather suggest running “sudo dpkg-reconfigure phpmyadmin” from SSH and opt to reinstall the phpmyadmin database (this won’t overwrite / delete any other databases that you’ve installed as part of the “vagrant up”).

    This would also be still valid when (hopefully) they fix that issue.

    Reply
  • Steve Graham
    October 9, 2013 6:58 pm

    Chris, thanks for the walk-through!

    I have everything working up to the point of entering the IP address, 192.168.56.101, into my browser to see the Apache index page. I get a 110 connection timed out error.

    Previously I’ve used port forwarding to be able to see the web code (192.168.56.101:8080) but I see that in this walk-through you don’t set up the Host Port and Box Port in the Set Up VM Locally section. Is this by design, or is it an oversite? If it is by design, any idea why I can’t see the Apache index page at 192.168.56.101?

    Reply
    • Chris
      October 9, 2013 7:35 pm

      Hey Steve, there’s no port because we simply use the default port 80 (192.168.56.101:80 and 192.168.56.101 is the same here). I don’t know what’s wrong with your setup, I would recommend you simply try to reinstall it again without setting up custom port stuff (and properly delete the old machine first with “vagrant halt” and “vagrant detroy” !!!!)

      Reply

Leave A Comment Cancel reply

hiphop php

Vote for “Hack” for HipHop/HHMV support (future style PHP) in PHPStorm 8

“Hack” will come. And “Hack” will change PHP, definitly. In case you never heard of it, have a look into

phpstorm-8

Ignore .idea folder from git in PHPStorm

By default (?) PHPStorm will create a hidden folder named .idea directly within your project, containing user-specific stuff like chosen

github-logo-octocat

GitHub rolls out .PSD diff and viewing

Good news for frontend designers / developers working with Photoshop a lot: GitHub has just rolled out native .psd support:

shadow dom

A quick video introduction into Shadow-DOM, the game-changing DOM-subtree-technology

Awesome talk by Eric Bidelman (of the Chrome team): Shadow-DOM was often heard in 2013 and seem to exist for

[Link] Improving Smashing Magazine’s Performance: A Case Study

The title says it all: A very interesting guide through the optimization process on one of the largest blogs in

composer

[Link] How to require versions of PHP, HHVM / HipHop, GD, curl, openssl etc. with Composer

Jeremy Kendall has just published a short and excellent overview on how to require versions of PHP (and explicit 64-bit

Useful basic linux stuff: Show kernel version, distribution name and distribution version on Ubuntu systems

Always nice to know: Show kernel version: uname -r Show kernel version and CPU: uname -a Show distribution version: lsb_release

twig

A 6min video introduction into Twig, the PHP templating engine

Cool video, excellently explained. Just 6 minutes, but features all the basics. Note that you can integrate Twig into your

cheap cloud server php

DigitalOcean rolls out interesting feature: Transfering server snapshots directly to the client’s account

Today DigitalOcean has rolled out a quite interesting new feature: You are now able to transfer a server snapshot (which

Compare 250+ cloud server plans with Cloud Cost Calculator

How cool is that ? The Cloud Cost Calculator compares more than 250 cloud server plans of Amazon, Rackspace, DigitalOcean,

1/4

Categories

Search

How Snapchat wants to earn money (by establishing vertical videos)
What’s new in PHPStorm 9
forbes 30 under 30
Need motivation ? Check out these 2 awesome “FORBES 30 under 30” lists (web, UI, games)
Frontend Ops Conf 2014 – Paul Irish: Delivering The Goods In Under 1000ms (40min video)
vagrant
Generate Vagrant boxes with Laravel, HipHop, Nginx, WordPress, MySQL, MariaDB, MongoDB, RabbitMQ etc. with one click
Berlin, prepare for TOA conference (15th – 17th of July)
js javascript
[video] Netflix JavaScript Talks about ECMAScript 7: The Evolution of JavaScript
mod-rewrite-ubuntu-14-04-lts
How to install / setup PHP 5.5.x on Ubuntu 12.04 LTS
modern-php
Creator of Slim framework and “PHP – The right way” writes book: “Modern PHP”, available 2015
composer
The difference between “composer install” and “composer update” – nailed on the head
ilovepreloaders – A tumblr collection of preloader animations
php
[Link] Excellent PHP best practices, 2014 style
Awesome next-gen PS4 graphics in “The Order: 1886”
Support FLARUM, the future of PHP forum scripts (with some dollars on Kickstarter)
js javascript
How JavaScript really works – An introduction into the JavaScript call stack by Philip Roberts (20min video)

Tags

apache bash centos composer conference coupon CSS debian fonts framework git GitHub hack HHVM HipHop HTML HTML5 IDE JavaScript JS LAMP laravel linux mod_rewrite MVC MySQL Nginx optimization PHP PHP 5.5 PHP 5.6 phpmyadmin PHPStorm security server SSD Ubuntu UI UX vagrant video virtual machine voucher VPS wordpress
Side-Project: Wordle-Solver:
www.wordle-helper.info

Pages

  • Privacy Policy
 
We use cookies on our website to give you the most relevant experience by remembering your preferences and repeat visits. By clicking “Accept”, you consent to the use of ALL the cookies.
Do not sell my personal information.
Cookie SettingsAccept
Manage consent

Privacy Overview

This website uses cookies to improve your experience while you navigate through the website. Out of these, the cookies that are categorized as necessary are stored on your browser as they are essential for the working of basic functionalities of the website. We also use third-party cookies that help us analyze and understand how you use this website. These cookies will be stored in your browser only with your consent. You also have the option to opt-out of these cookies. But opting out of some of these cookies may affect your browsing experience.
Necessary
Always Enabled
Necessary cookies are absolutely essential for the website to function properly. These cookies ensure basic functionalities and security features of the website, anonymously.
CookieDurationDescription
cookielawinfo-checkbox-analytics11 monthsThis cookie is set by GDPR Cookie Consent plugin. The cookie is used to store the user consent for the cookies in the category "Analytics".
cookielawinfo-checkbox-functional11 monthsThe cookie is set by GDPR cookie consent to record the user consent for the cookies in the category "Functional".
cookielawinfo-checkbox-necessary11 monthsThis cookie is set by GDPR Cookie Consent plugin. The cookies is used to store the user consent for the cookies in the category "Necessary".
cookielawinfo-checkbox-others11 monthsThis cookie is set by GDPR Cookie Consent plugin. The cookie is used to store the user consent for the cookies in the category "Other.
cookielawinfo-checkbox-performance11 monthsThis cookie is set by GDPR Cookie Consent plugin. The cookie is used to store the user consent for the cookies in the category "Performance".
viewed_cookie_policy11 monthsThe cookie is set by the GDPR Cookie Consent plugin and is used to store whether or not user has consented to the use of cookies. It does not store any personal data.
Functional
Functional cookies help to perform certain functionalities like sharing the content of the website on social media platforms, collect feedbacks, and other third-party features.
Performance
Performance cookies are used to understand and analyze the key performance indexes of the website which helps in delivering a better user experience for the visitors.
Analytics
Analytical cookies are used to understand how visitors interact with the website. These cookies help provide information on metrics the number of visitors, bounce rate, traffic source, etc.
Advertisement
Advertisement cookies are used to provide visitors with relevant ads and marketing campaigns. These cookies track visitors across websites and collect information to provide customized ads.
Others
Other uncategorized cookies are those that are being analyzed and have not been classified into a category as yet.
SAVE & ACCEPT