Logo
  • PHP
    • HipHop / HHVM
    • Modern PHP
    • PHPStorm
    • LAMP
    • Laravel
    • Composer
    • PDO
  • JavaScript
    • node.js
    • AngularJS
  • CSS
    • SASS
    • “CSS4” (CSS level 4)
  • HTML
  • Git
  • LAMP
  • Vagrant
  • UI / UX
  • Architecture of …
  • Off-Topic
With ♥ from Berlin
October 15, 2013
Chris
LAMP, Linux, Local Development, Modern PHP, PHP, Ubuntu, Vagrant, Virtual Machine / VM
10

How to setup a local server (in a virtual machine) with Vagrant in PHPStorm

PreviousNext
vagrant

This is part 1 of a series on How to get a modern workflow in PHP development.
Part 2 is here: How to debug code on a remote server (or in vagrant box) with PHPStorm.


What is Vagrant ?

Vagrant is a simple, but powerful technology that creates servers within virtual machines automatically from a single command line command or from a single text file. All the details, like linux destribution, IPs, installed packages, synced folder etc. can be pre-configured with a simple text file, stressless and reproduceable. You want your entire team to develop in exactly the same server config ? Simply share the text file and everybody will have exactly the same setup, within seconds!

Vagrant runs perfectly in Windows, Mac OS and most desktop Linux systems.


How does Vagrant work ?

For an overview how Vagrant works have a look into this article: How to setup a (or multiple) server/LAMP-stack inside a virtual machine for local development with Vagrant and PuPHPet. The official tutorial/documentation of Vagrant is quite cheesy by the way, they simply don’t explain how Vagrant works, so let’s have a short crash-course on that:

Basically Vagrant creates fully configured virtual machines (which usually contain a linux server) from a text file. These text files contain the IP of the box, the installed packages etc. and for sure the to-be-used linux distribution. Vagrant does not use casual .iso files of linux here, Vagrant uses special pre-prepared images of naked linuxes, packed into .box files. The creators of Vagrant provide these images for free, and currently there are also some alternative download locations on the web. To use a specific linux distribution, you have two possibilities:

1. You name the exact location of a .box file on the web within the Vagrant file, and Vagrant will download the .box while setting up your virtual machine:

# The url from where the 'config.vm.box' box will be fetched if it
# doesn't already exist on the user's system.
config.vm.box_url = "http://files.vagrantup.com/precise32.box"

2. Or you name the “shortcode” of a box file:

# Every Vagrant virtual environment requires a box to build off of.
config.vm.box = "precise64"

Shortcodes (this is not official Vagrant slang btw) simply define commonly used standard boxes, useful if you don’t want to download these .box files every time again you built a new virtual machine. To add a shortcode to your system (and get a copy of the according box) simply do this on the command line:

vagrant box add BOXNAME BOXLOCATION

which would be something like this:

vagrant box add precise64 http://files.vagrantup.com/precise64.box

This will download the Ubuntu 12.04 LTS Precise Pangolin 64bit box somewhere in your vagrant folder. From now, you can set up virtual machine that are built using exactly this ubuntu version by simply using the shortcode within the Vagrantfile (or on the command line, but more on that later). Please note: I’m not sure about this, but the shortcode needs to be exactly like the box’s filename.

You can find a full documentation on how to add, remove and list boxes here:
http://docs-v1.vagrantup.com/v1/docs/boxes.html

Okay, let’s start with the real setup now:


Requirements: PHPStorm, VirtualBox and Vagrant

If you don’t already have them installed, do it now: PHPStorm, VirtualBox and Vagrant. Keep in mind that some older versions of VirtualBox and Vagrant will not work together, so make sure you install the latest ones!

In PHPStorm, create a new project (or use an existing one, but keep things fresh und clean here).

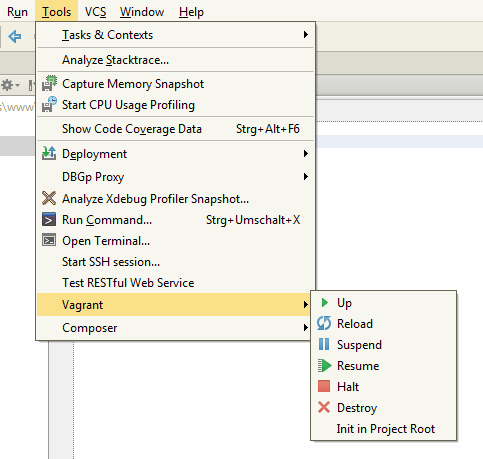
Create a new and fresh Vagrantfile via Tools > Init in project root.

If you have used Vagrant on your system before, then PHPStorm will create a fresh “Vagrantfile” in your project’s root. If this is your first use of Vagrant, then PHPStorm will ask you to select a Vagrant Box, which is currently impossible as the selection box is empty. Open a command line, and run this:

vagrant box add precise64 http://files.vagrantup.com/precise64.box

This will download a naked image of Ubuntu 12.04 LTS Precise Pangolin 64bit, which can then be used by Vagrant (and all tools that use Vagrant). There are other distributions available, but that’s a topic for another article.

Now, try again to create a new and fresh Vagrantfile via Tools > Init in project root. As there’s only one installable box in your system (the precise64) PHPStorm will take this box by default. When you have more installable boxes, PHPStorm will let you choose via a dialog message.

Open this file (should be the only file in your project now) and edit two things:


Set the IP our server will be reachable at

Search for this line

# config.vm.network :private_network, ip: "192.168.33.10"

and uncomment it by removing the “#” and change the last numbers of the IP to .101 ! This is the IP the server will be reachable. When you work with multiple Vagrant servers later it might be useful to keep your IPs organized, therefore I use .101 for one project, .102 for another and so on. Your line should look like

config.vm.network :private_network, ip: "192.168.33.101"

Side-fact: .1 is always reserved for system stuff, so dont use this one within the IP.


Setting the auto-sync folders

Vagrant will automatically sync a folder on your local harddisc with a folder within
the server – in real-time! Uncomment this line:

# config.vm.synced_folder "../data", "/vagrant_data"

change it to this

config.vm.synced_folder "./www", "/var/www"

and create a folder called “www” inside your PHPStorm project.


Set up the server

Do Tools > Vagrant > Up to create and start a new and naked server in a virtual machine.


How to setup a professional local server (in a virtual machine) with Vagrant in PHPStorm


PHPStorm will show the console and some things will go on, the server is installed and up when you see the “exit code 0” (which sounds bad, but is good).
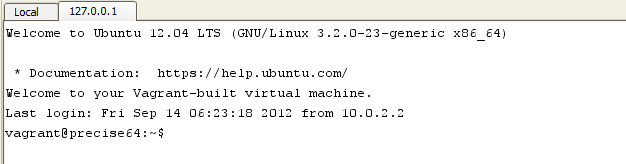
Log into the server with SSH via Tools > Start SSH session (and select the first host in the list). You will be automatically logged in into the created server (totally config-free, no password/key needed here). Note the command line tool PHPStorm just opened !
“Welcome to your Vagrant-built virtual machine.”

If nothing happens follow this: Do you see a command line of the HOST system (your win/mac/linux system) ? Move to your project folder and type

vagrant ssh

This should log you into the server. That’s not the intended behaviour as PHPStorm offers a integrated one-blick ssh solution here, but it does the job when to whatever reason the internal ssh client does not show up.

Still problems ? Do you get a message about “no ssh client” ? Well, then you have no SSH client on your system (how the hell have you managed your work until today ???). Get one. On windows, Putty (chose the installer, not the one-file download) and Git (which comes with its own SSH client) are useful. I’m wondering why PHPStorm even asks for an external client as it comes with an integrated one, but however, installing Putty or Git solves this.


How to setup a professional local server (in a virtual machine) with Vagrant in PHPStorm

Now set up a basic server, like usually:

sudo apt-get update
sudo apt-get upgrade
sudo apt-get install apache2
sudo apt-get install php5

By the way, if you would like to install the very latest version of PHP, currently PHP 5.5.4, have a look into How to install/setup latest version of PHP 5.5 on Ubuntu 12.04 LTS (Precise Pangolin).

Your server is now fully installed. Please note that there’s now an index.html in your www folder within your PHPStorm project. This is because this folder syncs with the /var/www from within the server automatically and bi-directional. The index.html is the famous “It works!” file from the apache installation. Now change that file to for example index.php and put something like this in there:

<?php
phpinfo();

Now open your browser, enter the IP you have given to this Vagrant box, probably

http://192.168.33.101

and see the result. Wonderful, you now have a full Ubuntu server running on your Windows/Linux/Mac host system, easily start- and stoppable and ssh-accessable with one click.

This is – as far as I know – currently the most advanced way to develop locally in PHP. Your host system and your development stuff is clearly splitted, and you’ll be able to run many Vagrant boxes parallel, perfect for working with different clients or while creating a multi-server environment.

And it gets better! This “remote server” is also debugable, but more on that in the second part of this tutorial: How to debug code on a remote server (or in vagrant box) with PHPStorm.


Finally some hints:

When you decide to delete a project, also delete the Vagrant box with Tools > Vagrant > Destroy, otherwise you’ll have a dead virtual machine in your VirtualBox folder, blocking the machine’s IP and taking away 2-3 GBs.

When the box is not reachable, try to stop, reload and up the box first and have a look into the configs: Are sync folders correct, do they exist ? Is the IP unique or does another box use it already ?


This article was written quite a while ago (10 years), please keep this in mind when using the information written here. Links, code and commands might be outdated or broken.

Random articles

  • How to setup a (or multiple) server/LAMP-stack inside a virtual machine for local development with Vagrant and PuPHPetHow to setup a (or multiple) server/LAMP-stack inside a virtual machine for local development with Vagrant and PuPHPet
  • How to install/setup a basic LAMP stack (Linux, Apache, MySQL, PHP) on Ubuntu 14.04 LTSHow to install/setup a basic LAMP stack (Linux, Apache, MySQL, PHP) on Ubuntu 14.04 LTS
  • [Link] How to set up HipHop, Nginx and Laravel in Ubuntu 12.04 LTS (in a Vagrant box)[Link] How to set up HipHop, Nginx and Laravel in Ubuntu 12.04 LTS (in a Vagrant box)
  • Generate Vagrant boxes with Laravel, HipHop, Nginx, WordPress, MySQL, MariaDB, MongoDB, RabbitMQ etc. with one clickGenerate Vagrant boxes with Laravel, HipHop, Nginx, WordPress, MySQL, MariaDB, MongoDB, RabbitMQ etc. with one click
  • A list of downloadable Vagrant boxes (CentOS 5.9 / 6.4, Ubuntu 12 / 13, Debian 6 / 7 / 7.1 / 7.2)A list of downloadable Vagrant boxes (CentOS 5.9 / 6.4, Ubuntu 12 / 13, Debian 6 / 7 / 7.1 / 7.2)
  • How to install/setup a basic LAMP stack (Linux, Apache, MySQL, PHP) on Ubuntu 12.04 or Debian 7.0/7.1How to install/setup a basic LAMP stack (Linux, Apache, MySQL, PHP) on Ubuntu 12.04 or Debian 7.0/7.1
  • PHPStorm: 42 Tips and Tricks (47min video talk by Mikhail Vink at Dutch PHP Conference 2015)PHPStorm: 42 Tips and Tricks (47min video talk by Mikhail Vink at Dutch PHP Conference 2015)
  • What’s new in PHPStorm 9What’s new in PHPStorm 9
  • A super-simple Vagrant LAMP stack bootstrap (installable with one command)A super-simple Vagrant LAMP stack bootstrap (installable with one command)
LAMPPHPPHPStormUbuntuvagrantvirtual box
Share this

10 Comments

  • peter
    April 5, 2016 8:10 pm

    I really need a little help here… All looks well except the the last part
    http://192.168.33.101/ gives me “ERR_CONNECTION_REFUSED”.

    I’ve tried added port forwarding in VirtualBox HostPort:80, GuestPort:8080

    and tried the below:
    http://192.168.33.101:8080/
    http://192.168.33.101:22/
    http://192.168.33.101:2222/

    and all gives the same error.., am really new to php development and i really got no idea what to proceed. very appreciate if someone could shed some light

    p/s: I’m doing all this in Windows7.

    Reply
  • Christian Johansson
    October 28, 2014 3:11 pm

    This was a very good tutorial, keep up the good work.

    Reply
  • Jason Davis
    January 20, 2014 4:56 pm

    I have been watching Vagrant for over a year and think it’s the coolest thing, I just haven’t put it to use yet. I like that your article is a nice simple how-to guide but I wouyld like to see how to automate instralling apache and PHP and configuring those all automated as well with Vagrant, maybe another article?

    Reply
    • Chris
      January 20, 2014 5:14 pm

      Thanks! :) Maybe I’ll add this when there’s time, but to be honest I don’t know how to automate this manually. But there’s an excellent tool doing this already, check puphpet.com for a full-featured web-interface that allows super-simple creation of distro, apache, nginx, mysql, php version, packages, vhosts, etc. ! Definitly worth a bookmark.

      Reply
  • starterdev
    November 19, 2013 11:02 pm

    excellent tutorial and looking forwards to the debug tutorial

    Reply
    • Chris
      November 19, 2013 11:29 pm

      Thanks! ;) I’ve just linked the Debug Tutorial (in the first and last line of the article).

      Reply

Leave A Comment Cancel reply

hearthbleed-ssl-bug

A quick guideline on how to fix the Hearthbleed bug (and update OpenSSL) on Ubuntu

If you still haven’t fixed your servers after mainstream discovery of the legendary Hearthbleed bug, then do it now –

Frontend Ops Conf 2014 – Paul Irish: Delivering The Goods In Under 1000ms (40min video)

This article was written quite a while ago (9 years), please keep this in mind when using the information written

phpstorm 7.0 php

A perfect video tutorial to get started with xdebug in PHPStorm

Laracast just published an excellent short tutorial on how to get install xdebug in a local environment and how to

compress-png

Compress png, jpeg, gif and svg up to 90% with Compressor.io

What a fantastic tool: Compressor.io is a totally free service that let you compress png, jpeg, gif or svg files

php

How to install PHP 7.0 on Ubuntu 14.04 LTS

You want to install PHP 7 within 60 seconds ? No problem, but first make sure you have a fresh

php

12 tools for better PHP quality

Nice selection of 12 tools every PHP developer should bookmark. I totally love how the PHP community becomes some kind

Useful basic linux stuff: Show kernel version, distribution name and distribution version on Ubuntu systems

Always nice to know: Show kernel version: uname -r Show kernel version and CPU: uname -a Show distribution version: lsb_release

php

How to install the mcrypt php extension (to use Laravel 4)

When installing Laravel 4 on a fresh Ubuntu or Debian system, you’ll probably get this error message: “Laravel requires the

css3-chrome-font

[Link] Retinafy your Site / Device by Nijiko Yonskai

A simple one-page Gist with all the information you need to make your sites retina-ready: Nijiko Yonskai – Retinafy your

phpstorm 7.0 php

How to setup and use XDEBUG with PHPStorm 6/7 (locally in Windows 7/8 and Mac OS X)

Real debugging is probably one of the most coolest things that are possible in software development: Remember the times where

1/4

Categories

Search

php
“Belt” adds very clever everyday functions to PHP, comes with JavaScript naming styles and eventually solves the needle/haystack problem
composer
How to install Composer on Windows 7 / 8 or Ubuntu
git-php-deployment
Extremely simple deployment with PHPloy
laracon-2014-eu-amsterdam
Laracon 2013 – Kapil Verma: Engineering Complex Applications with Laravel 4 (40min video)
phpstorm-8
PHPStorm 8 (early access version) released – for free
october cms
October CMS, built on top of Laravel, is beautiful, clever and on the way to be the new #1 CMS
Material Design – How Google designed Android L (7min video)
ubuntu-14-04-lts lamp
How to install/setup a basic LAMP stack (Linux, Apache, MySQL, PHP) on Ubuntu 12.04 or Debian 7.0/7.1
What’s new in PHPStorm 9
php uk conference
PHP Caching Best Practices by Eli White (video from PHP UK Conference 2014)
php
How to install the mcrypt php extension (to use Laravel 4)
bash-command-line-tutorial
Best introduction to unix command line / bash ever (by André Augusto Costa Santos)
composer
[Link] How to require versions of PHP, HHVM / HipHop, GD, curl, openssl etc. with Composer
Frontend Ops Conf 2014 – Sarah Goff-Dupont: Git, Continuous Integration and Making It Pretty (31min video)
composer
A short & simple Composer tutorial

Tags

apache bash centos composer conference coupon CSS debian fonts framework git GitHub hack HHVM HipHop HTML HTML5 IDE JavaScript JS LAMP laravel linux mod_rewrite MVC MySQL Nginx optimization PHP PHP 5.5 PHP 5.6 phpmyadmin PHPStorm security server SSD Ubuntu UI UX vagrant video virtual machine voucher VPS wordpress
Side-Project: Wordle-Solver:
www.wordle-helper.info

Pages

  • Privacy Policy
 
We use cookies on our website to give you the most relevant experience by remembering your preferences and repeat visits. By clicking “Accept”, you consent to the use of ALL the cookies.
Do not sell my personal information.
Cookie SettingsAccept
Manage consent

Privacy Overview

This website uses cookies to improve your experience while you navigate through the website. Out of these, the cookies that are categorized as necessary are stored on your browser as they are essential for the working of basic functionalities of the website. We also use third-party cookies that help us analyze and understand how you use this website. These cookies will be stored in your browser only with your consent. You also have the option to opt-out of these cookies. But opting out of some of these cookies may affect your browsing experience.
Necessary
Always Enabled
Necessary cookies are absolutely essential for the website to function properly. These cookies ensure basic functionalities and security features of the website, anonymously.
CookieDurationDescription
cookielawinfo-checkbox-analytics11 monthsThis cookie is set by GDPR Cookie Consent plugin. The cookie is used to store the user consent for the cookies in the category "Analytics".
cookielawinfo-checkbox-functional11 monthsThe cookie is set by GDPR cookie consent to record the user consent for the cookies in the category "Functional".
cookielawinfo-checkbox-necessary11 monthsThis cookie is set by GDPR Cookie Consent plugin. The cookies is used to store the user consent for the cookies in the category "Necessary".
cookielawinfo-checkbox-others11 monthsThis cookie is set by GDPR Cookie Consent plugin. The cookie is used to store the user consent for the cookies in the category "Other.
cookielawinfo-checkbox-performance11 monthsThis cookie is set by GDPR Cookie Consent plugin. The cookie is used to store the user consent for the cookies in the category "Performance".
viewed_cookie_policy11 monthsThe cookie is set by the GDPR Cookie Consent plugin and is used to store whether or not user has consented to the use of cookies. It does not store any personal data.
Functional
Functional cookies help to perform certain functionalities like sharing the content of the website on social media platforms, collect feedbacks, and other third-party features.
Performance
Performance cookies are used to understand and analyze the key performance indexes of the website which helps in delivering a better user experience for the visitors.
Analytics
Analytical cookies are used to understand how visitors interact with the website. These cookies help provide information on metrics the number of visitors, bounce rate, traffic source, etc.
Advertisement
Advertisement cookies are used to provide visitors with relevant ads and marketing campaigns. These cookies track visitors across websites and collect information to provide customized ads.
Others
Other uncategorized cookies are those that are being analyzed and have not been classified into a category as yet.
SAVE & ACCEPT